
Coarse Putty Can Refine a Wall. Can It Correct One?
Why surface smoothness and wall-level geometry are not the same — and why the existing Mivan wall must determine the finishing system.
“Gypsum is not required. Coarse putty can be applied directly over the Mivan wall.”
This proposition is common across construction projects — and it is not necessarily wrong.
Where the RCC wall already has acceptable geometry and contains only minor pores, shallow depressions or limited surface defects, coarse putty can provide an efficient finishing solution.
The problem begins when this product-level assurance is interpreted more broadly:
If coarse putty can be applied over Mivan RCC, it can also correct any wall undulation that may exist underneath.
Those are two very different claims.
One concerns whether the material can adhere to and cover the surface.
The other concerns whether the complete finishing method can convert an uneven RCC wall into one continuous, visually flat finished surface.
To understand the difference, we must separate two distinct finishing functions:
Creating or correcting the wall geometry
Filling and refining the surface
Gypsum and coarse putty may overlap in some applications. But they do not always perform these two functions with equal capability.
A Simple Analogy
An idol maker would not choose the final surface-finishing material to create the idol’s basic form.
The material used to establish the overall shape needs sufficient body, working time and moulding capability. A finer finishing layer may then smooth small imperfections before painting.
Both materials may be compatible with the same surface. That does not make their functions interchangeable.
Coarse putty and gypsum should be understood in the same way.
Coarse putty may refine a Mivan wall whose geometry is already acceptable. But where the wall itself contains widespread waves, projecting portions and depressions, the requirement is no longer only surface refinement. The project may first need a process capable of establishing a new wall-level reference.
Begin With The Wall — Not The Material
The discussion often starts with questions such as:
Can coarse putty be applied over Mivan concrete?
Can it fill a particular depression?
Can multiple coats be used?
What thickness does the manufacturer permit?
These are relevant questions, but they do not fully answer the site requirement.
A material may be capable of filling one isolated hollow without being capable of correcting repeated waves across an entire wall.
The more useful question is:
Can this material, applied with the proposed tools and method, repeatedly produce the required finished wall geometry from the actual RCC surface available at site?
That question cannot be answered by material thickness alone.
It depends on the wall condition, working time, application method, correction tools, lighting exposure and expected finish standard.
What Makes Plaster And Gypsum Capable Of Creating A New Wall Surface?
Conventional internal cement plaster is often applied at approximately 12 mm, with practical ranges commonly around 10–15 mm depending on the masonry, specification and required correction.
The thickness gives the process room to absorb variations in the wall below it.
But thickness is only one part of its geometry-correction capability.
Plastering is normally controlled through:
Reference dots and screeds
Plumb and level checks
Wet and workable material across a meaningful wall area
Long tools such as a matkol or aluminium straightedge
Repeated checking and redistribution of material
The long straightedge bridges projecting and depressed portions of the wall.
Where excess wet material projects beyond the required level, it can be cut away. Where the wall falls behind the required level, more material can be introduced.
The applicator is therefore not simply smoothing one small patch after another.
The complete wall is being brought towards one common reference surface.
Gypsum punning or gypsum levelling can perform a similar function at a thinner scale.
Over reasonably executed Mivan RCC, gypsum may commonly be used at around 6–8 mm, with practical applications often falling within approximately 4–10 mm. Greater local thickness may sometimes be required, subject to the approved material system and project specification.
Again, its capability comes from the combination of:
Adequate material body
Sufficient working time
Continuous wall-level application
Long-tool control
The ability to cut and redistribute wet material
These characteristics allow gypsum to function as a plane-forming process — a process that can create a new reference surface rather than simply follow the existing RCC profile.
The Small-Blade Limitation
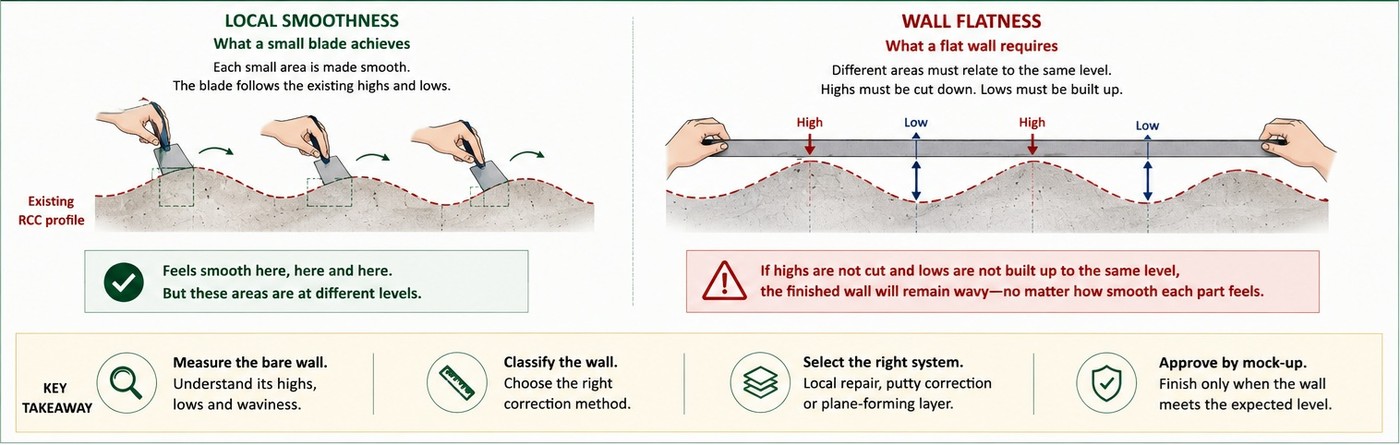
Coarse putty is usually applied in much smaller working zones, commonly using a blade of approximately eight inches or another relatively small hand tool.
That tool may work very effectively over the area it covers.
The difficulty is that the wall defect may extend gradually across one or two metres.
The applicator may smooth one small portion, then the next, and then another. Each portion may appear neat and may feel smooth when checked locally.
But the small blade does not automatically relate all those portions to one common wall-level reference.
As a result:
Every small area may be smooth while the complete wall still retains the underlying waviness of the RCC surface.
This is the distinction at the heart of the issue:
Local smoothness is not wall flatness.
Smoothness describes the condition immediately beneath the blade or hand.
Flatness describes how different areas relate to one another across a much larger part of the wall.
A small blade can achieve the first without necessarily achieving the second.
Why The Long Straightedge Matters
In plastering or gypsum work, a long straightedge performs several functions together.
It acts as:
A measuring tool
A levelling reference
A cutting tool
A material-redistribution tool
When it rests across a projecting area and an adjacent depression, the difference becomes visible immediately.
Because there is sufficient wet and workable material across the larger area, the applicator can act on that information:
Remove excess material from the projecting portion
Add material to the depression
Redistribute the layer
Check the wall again against the same long reference
With coarse putty, the straightedge may still reveal that a gap or wave exists.
The difficulty is correcting it efficiently.
The putty may already have been applied in several small sections. Some portions may remain wet while others have begun drying. There may not be enough workable material across the complete length of the straightedge to redistribute meaningfully.
Attempting to drag the tool across the wall may:
Tear partially dried putty
Roll the material
Disturb already-finished sections
Simply identify the unevenness without correcting it
The tool can therefore expose the wall problem without the material and application method providing an efficient wall-level solution.
Working Time Determines How Much Wall Can Be Controlled Together
Correcting wall geometry requires more than spreading material.
The applicator must:
Apply the material
Check the larger wall area
Identify projecting and depressed portions
Redistribute or add material
Recheck the corrected surface
This requires sufficient working time across a reasonably large, continuous area.
Plaster and suitable gypsum systems generally allow this sequence to occur while the material remains workable.
Coarse putty often moves the activity towards smaller working sections. By the time one portion is completed and the next is being corrected, the earlier portion may already be at a different stage of drying.
This makes wall-level redistribution more difficult and encourages a patch-by-patch method.
The result may be a well-refined surface that still follows much of the original RCC shape.
This is not necessarily a failure of applicator skill.
It is a limitation created by the combination of material thickness, working time, application area and correction tool.
Filling One Hollow Is Not The Same As Correcting A Wall
A supplier may correctly demonstrate that coarse putty can fill a particular depression.
But a wall rarely contains only one perfectly isolated depression.
It may contain a gradual sequence of:
Shallow hollows
Projecting portions
Panel-joint differences
Gentle waves extending across a larger area
Filling one hollow may make that particular spot level.
But if the wall rises and falls around it, the complete surface may still appear wavy.
Additional material may then be applied around the corrected spot to create a smoother transition. That correction may have to extend farther and farther until a much larger part of the wall is being built out.
At that stage, the activity is no longer a simple local repair.
It is effectively an attempt to create a new wall surface using a material and tool system primarily suited to thinner, smaller-area correction.
This is why the ability to fill a deep local spot should not be confused with the ability to establish one continuous wall level.
Projecting Portions Are More Difficult Than Depressions
Depressions naturally attract attention because they require filling.
But projecting portions — crests, bulges or high points — often control the final correction requirement.
A depression can receive additional material, within the approved limits of the finishing system.
A projecting portion cannot be corrected merely by adding material over it.
The available options are to:
Grind down the projection
Raise the surrounding wall to the same level
Use an appropriate plane-forming process
Accept the visible variation
Consider one small projection in the middle of a wall.
If it is not ground down, the surrounding surface may need to be built out until it reaches the same level. A defect affecting a small area can therefore influence the correction thickness over a much larger portion of the wall.
Where several such projections exist, the correction becomes progressively more difficult.
The issue is no longer simply how much material can be placed in a depression.
The issue becomes:
Which projecting portion will determine the level of the finished wall?
Why The Problem Becomes Visible Only After Finishing
Bare Mivan RCC contains considerable visual variation:
Shuttering marks
Curing marks
Pores
Repairs
Changes in colour
Changes in texture
Panel impressions
These variations break up the wall visually and conceal shallow changes in geometry.
After putty, primer and paint, the colour and texture become more uniform.
The eye then begins to read the wall as one continuous surface.
Grazing daylight from large openings, low-angle sunlight and wall-grazing artificial lighting can reveal crests and depressions through subtle highlights and shadows.
The finished wall is then criticised for being undulated.
But the finishing process may not have created the undulation.
It may simply have removed the visual variation that previously concealed it.
Why The Painter Becomes The Apparent Point Of Failure
By the time an undulation becomes clearly visible, the finishing contractor is normally the last agency to have worked on the wall.
The painter or putty applicator therefore becomes the apparent source of the problem.
But the finishing team may have received:
No measured record of the bare RCC geometry
No agreed distinction between plumbness and local wall regularity
No identified high points or depressions
No defined limit for correction using coarse putty
No approved alternative where the wall requires broader levelling
No lighting-based visual acceptance standard
The painter is then expected to correct formwork, alignment and casting variations using a thin finishing layer and a small blade.
The problem is not necessarily that the painter lacks skill.
The system may have provided neither:
An adequately controlled existing wall surface
A suitable geometry-correction process
Where Coarse Putty Works Well
Coarse putty should not be rejected merely because some Mivan walls require gypsum.
It can be an efficient and appropriate solution where:
The RCC wall has already been assessed
The wall geometry is broadly acceptable
Defects are limited and local
Significant projections have been ground
Repeated waviness is absent
The required build-up remains within the approved putty system
The finish expectation is compatible with the substrate
Lighting conditions are not unusually demanding
Under these circumstances, applying gypsum across every wall may create unnecessary cost, material consumption and process time.
The problem is not the use of coarse putty.
The problem is specifying it universally before establishing whether the wall condition is suitable.
Wall Assessment Is A Separate Process — And An Additional Cost
This decision cannot be made reliably through a quick visual inspection of bare concrete.
A deliberate pre-finishing wall assessment is required.
That assessment is itself an additional activity. It requires:
Defined responsibility
Trained personnel
Suitable measuring tools
Time before finishing begins
Documentation and marking
Agreed acceptance criteria
An associated cost
The assessment may classify walls into three broad groups.
Acceptable Geometry
Typical characteristics:
Limited defects
No repeated waviness
No significant projecting areas
Possible treatment:
Local repair
Coarse putty
Fine putty and paint
Selective Correction Required
Typical characteristics:
Isolated projections
Depressions
Panel-joint differences
Possible treatment:
Grind projecting areas
Fill depressions
Apply a controlled putty system
New Wall Surface Required
Typical characteristics:
Repeated waves
Several controlling projections
Large-area variation
Demanding lighting
Possible treatment:
Gypsum levelling
Another approved plane-forming treatment
The specific limits should be defined by the project team and supported through measurement, mock-ups and agreed visual standards.
The purpose is not to add a bureaucratic inspection step.
It is to prevent an unsuitable finishing system from being selected on assumption and then corrected through repeated rework.
Product Suitability Is Not The Same As Outcome Capability
In many projects, the decision to use coarse putty begins with a supplier or OEM assurance that the product is suitable for application over Mivan RCC and can accommodate a specified local thickness.
That assurance may be technically correct.
But it answers only a product-level question.
It does not establish that the complete finishing process can correct every possible RCC wall condition and repeatedly deliver a premium, visually flat surface.
That outcome depends on the interaction of:
Existing wall geometry
Number and location of projecting portions
Permissible correction thickness
Material working time
Application tools
Wall-level measurement
Lighting conditions
Required finish quality
Agreed acceptance standard
A good product can perform exactly as intended while the complete finished wall still fails the expected visual outcome.
The distinction is therefore not between a “good” material and a “bad” material.
It is between:
A material that is suitable for the assessed wall condition
A material being expected to perform a role beyond the capability of the complete application system
Let The Wall Determine The Finishing System
A more reliable sequence is:
Inspect and profile the bare RCC wall
Assess overall vertical alignment separately from local waviness
Identify projecting and depressed portions
Understand the expected lighting exposure
Define the required finish class
Select the appropriate correction method
Approve representative mock-ups
Record wall acceptance before full-scale finishing begins
This protects the developer, consultant, OEM and finishing contractor.
It also moves the geometry decision to the stage where it can be managed — before putty and paint make the problem visually obvious.
Coarse putty can refine an acceptable Mivan wall.
Where the existing RCC surface requires a new reference level across a larger area, a genuine plane-forming process may still be necessary.
That is not an argument for gypsum on every wall.
It is an argument for selecting the finishing system only after understanding the wall it is expected to finish.
Execution Engineering begins where the product claim ends: by asking whether the complete site method can repeatedly create the required outcome under actual conditions.